Showing posts with label Blogger Guides. Show all posts

December 9, 2015

Make Blogger Nofollow Link With Javascript

nofollow link with javascript
Nofollow link mean tell search engine do not follow the link, I has been post about make automatic nofollow link for blogger and explanation what is nofollow and dofollow link, you can read on this post: http://myblog-note.blogspot.com/2014/03/make-blogger-nofollow-link.html.

But in this article I post another way to create nofollow link with javascript syntax, there are some argument what is the best, make nofollow link manual, or make it automatic for all external link inside your blog or website, for me, I think better make this automatic for all external link, because this for external not internal, so search will take little time and focus when crawl my site - CMIIW ;d).

On my post before, I post 2 way how to do this, one from dashboard setting, and the other one with Jquery syntax, now you only need to put this code below above </head>.

Login to you Blogger dashboard, click Template, and click Edit HTML, scroll down to find </head> or simply press ctrl-f and seacrh for </head>, paste this code above it:

<script type="text/javascript">
    var a = $(this);
    var href = a.attr('href');
    $(document).ready(function() {

      $("a[href^='http://']").each(function () {
         if(this.href.indexOf(location.hostname) == -1) {
            $(this).attr('target', '_blank');
    $(this).attr('title', 'Open in a new window');
            $(this).attr('rel', 'nofollow');
          }
        }
      );
    $("a[href^='https://']").each(function () {
    if(this.href.indexOf(location.hostname) == -1) {
            $(this).attr('target', '_blank');
    $(this).attr('title', 'Open in a new window');
            $(this).attr('rel', 'nofollow');
    }
    }
    );    
    });
</script>

Don't forget to click SAVE TEMPLATE.

Now you can test by give your blog one external link and preview it to make sure the code is running, and it also run with your website, just put it before </head>, usually inside your header.


You can also read this technique from the source: http://www.thewildblogger.com/2013/12/automatically-add-rel-nofollow-attribute-in-blogger.html

That's it, Thank you

March 31, 2014

Make Automatic Nofollow Link for Blogger External Link

Before make automatic nofollow link for Blogger external link, first you must know what is nofollow link and dofollow link, Nofollow link is external link inside your blog which not follow by search engine when crawl your blog or site, beside nofollow, there is also external link called dofollow.

Create Automatic Nofollow Link for Blogger.

Dofollow link is external link which tell search engine to follow it, so if your blog or site getting crawl by search engine, the external link will index and follow, because it is a blog or website that gives dofollow link is very attractive to people who are looking for backlinks.

Create Blogger Nofollow Link.

If your site gives dofollow for external links, as long as it point to useful website, is okay, but if spam sites put they link in your site, or you point to them, it can hurt your SEO and even can make your site get a penalty from search engine, especially Google and spam site usually left they link inside comment.

How Nofollow Link look?, see code below:

<a href="http://YOUR-EXTERNAL-LINK" rel="nofollow">
EXTERNAL LINK DISPLAY TEXT</a>

How Dofollow Link look? see below:

<a href="http://YOUR-EXTERNAL-LINK" >EXTERNAL LINK</a>

Actually you can make manually all external link to nofollow, to make external link inside your post became nofollow edit your link look like nofollow link above, edit from HTML post, or click Link menu and checklist nofollow, see image below :

setup blogger link nofollow

For external link inside comment will automatically nofollow if you set only registered user can comment on Setting > Post and Comments menu inside your dashboard, see image below:

setup blogger comment nofollow

But if you want make all external link became nofollow except your blog address, go to your dashboard and then click Template, then Edit HTML, and add javascript code below before </head> :

<!--remove if you already have another jquery.js-->
<script src='http://ajax.googleapis.com/ajax/libs/jquery/1.8.2/jquery.js' type='text/javascript'></script>
<!--End-->

<script type="text/javascript">
jQuery(document).ready(function () {
jQuery('a[href*="http://"]:not([href*="http://YOUR-BLOGSPOT-URL"])').attr('rel', 'nofollow');
jQuery('a[href*="https://"]:not([href*="https://YOUR-BLOSPOT-URL"])').attr("target", "_blank");
 });
</script>

Save and see the results on your blog, thanks.

March 23, 2014

Display Static Home Page on Blogger

Different by WordPress which providing options to display latest post or static page on home page, displaying static home page on Blogger need some tricks to be done. Before display static page on your blogger home page, first you must know how to create a static page, because this is important steps to do this, the point is redirect your address blog to a static page.

Here Steps for Display Static Home Page on Blogger:

1. Login to your Blogger dashboard and click Pages menu, click New Page to create a static page, see image below:
Add Static Page Blogger

After that give the title on next page display, let says Your Static Page and give some text inside it, eg. 'Hey, this is my static home page test on Blogger' or upload some image to test its running, see image below:

Post Static Page Blogger

Steps number one above will create permalink url : http://your-blogspot/p/your-static-page.html, this URL will used to setup redirect for static home page later.

2. It's time to setup redirect to make your Blogger static home page, go to Settings and click Search preferences, find Custom redirects text and click edit beside it, look at image below:

Display Static Home Page on Blogger - Custom Redirects

And fill / on From: column, /p/your-static-page.html on To: column, checklist Permanent box and click Save setting, see image below:

Display Static Home Page on Blogger - Redirect

Until this step, your static home page is finished, you can test it by visit your blogspot address, it will redirect to static page that created before.

3. Last steps is hide your-static-page.html in page navigation, go to Layout menu and click edit on Pages navigation gadget, inside it (Configure Page List), search Page to show and uncheck Your Static Page box, then save.

Now the steps is complete and you have Blogger with static home page, you can make some display as you wish, or put html template, so your blog have more nice looking display, left a comment if you get some problem to implement this trick, thanks.

How to Edit Live Blogger Template and Customize it

By default Blogger has provide some template to used, but sometimes people need to edit it according what they want, for example, they need some modification on home page or need add some javascript code inside the template, to do that you must know how to edit live Blogger template.

Edit Blogger template can be done by various way, but these article will show you how to do that from your dashboard, first go to blogger homepage on http://blogger.com and log-in with your acount, from dashboard click combo beside 'View blog' text, scroll down and click Template, see image below (watch black arrow):

How to Edit Live Blogger Template - Dashboard

After above steps, template menu will display, see image below:

 How to Edit Live Blogger Template - Template Menu

In above image you can see two screenshot display about your blog, on the left is screenshot your live blog, and the right is your blog on mobile tempate, you can preview it to see how it works, there are two button below screenshot live on blog, one is Customize and the other one is Edit Html.

Customize button is a blogger template designer to adjust template preferences, for example blog width, size, arrange sidebar, footer placement, 2 column or 3 column mode template, font used, color, background and some others environment variables, this menu will display how your blog live on internet and you can try some template display and finished with Apply button on top right corner, see image below:

How to Edit Live Blogger Template - Template Designer

Edit Html button is template editor to adjust your blog on manual way, add some javascript code, search some code to replace by another code, or even deleted it. This menu has Preview button to see how some modification that your created will display on your live blog before your published it. You don't need to search the code manually, because there is search box display if you hit Ctrl-F inside there. And don't forget to click save template to finished it, see image below:

How to Edit Live Blogger Template - Template Editor

That's it about how to edit live Blogger template and customize it, thanks.

February 23, 2014

Random Post Blogger Without Thumbnail

On my previous post, we talk about how to display blogger random post with thumbnail, whether it is in sidebar widget or after your footer, the goal is to show the readers what is others post that we have, so they can easily picked what article they liked, today I show you another method to do that, and its about how to display random post blogger without thumbnail, see image below:

Random Post Blogger Without Thumbnail

For display it on your sidebar widget, you must go to Dashboard, click Layout and click add Gadget, scroll down to find HTML/Javascript gadget, click it and copy below code inside it, then save:

<!-- Random Post Start -->
<style>
#ramdomcat{float:left;  margin-top:0px;  margin-bottom:10px}
#ramdomcat ul{float:left;  margin:0px;  margin-left:20px;  padding:0px;  font-size:14px}
#ramdomcat li{list-style:disc outside url("http://2.bp.blogspot.com/-NcWoSJbuheg/Utjpc3PoLSI/AAAAAAAAAlA/Bp1xTt7G0UM/s1600/kotak2.png"); width:auto; margin-bottom:0;margin-top:0;padding:0;vertical-align:middle;}
#ramdomcat a{font-family: 'open sans',arial,sans-serif;text-decoration:none;  color:#0F0F0F; font-size:14px}
#ramdomcat a:visited {color:blue; text-decoration: none}
#ramdomcat a:hover{color:red}
</style>

<script type='text/javascript'>
var relatedpoststitle="";
</script>
<script type='text/javascript'>
var relatedTitles = new Array();
var relatedTitlesNum = 0;
var relatedUrls = new Array();
function random_results_label(json) {
for (var i = 0; i < json.feed.entry.length; i++) {
var entry = json.feed.entry[i];
relatedTitles[relatedTitlesNum] = entry.title.$t;
for (var k = 0; k < entry.link.length; k++) {
if (entry.link[k].rel == 'alternate') {
relatedUrls[relatedTitlesNum] = entry.link[k].href;
relatedTitlesNum++;
break;
}
}
}
}
function removeRandomDuplicate() {
var tmp = new Array(0);
var tmp2 = new Array(0);
for(var i = 0; i < relatedUrls.length; i++) {
if(!contains(tmp, relatedUrls[i])) {
tmp.length += 1;
tmp[tmp.length - 1] = relatedUrls[i];
tmp2.length += 1;
tmp2[tmp2.length - 1] = relatedTitles[i];
}
}
relatedTitles = tmp2;
relatedUrls = tmp;

}
function contains(a, e) {
for(var j = 0; j < a.length; j++) if (a[j]==e) return true;
return false;
}
function showRandomLabels() {
for(var i = 0; i < relatedUrls.length; i++)
{
if(relatedUrls[i]==currentposturl)
{
relatedUrls.splice(i,1)
relatedTitles.splice(i,1)

}
}
var r = Math.floor((relatedTitles.length - 1) * Math.random());
var i = 0;

if(relatedTitles.length>1)
document.write('<ul>');
while (i < relatedTitles.length && i < 20 && i<maxresults) {
document.write('<li><a href="' + relatedUrls[r] + '">' + relatedTitles[r] + '</a></li>');
if (r < relatedTitles.length - 1) {
r++;
} else {
r = 0;
}
i++;
}
document.write('</ul>');
}
</script>
<div id="ramdomcat">
<script type="text/javascript" src="/feeds/posts/default?alt=json-in-script&amp;callback=random_results_label&amp;max-results=10"></script>
<script type="text/javascript">
var currentposturl="";
var maxresults=10;
removeRandomDuplicate(); showRandomLabels();
</script>
</div>
<!-- Random Post End -->

To display random posts related for your label (categories) , find and edit this code below:

src="/feeds/posts/default?alt=json-in-script

change to

src="/feeds/posts/default/-/yourLabel?alt=json-in-script

example: src="/feeds/posts/default/-/Blogger%20Guides?alt=json-in-script

And how many post will display, find this code below (you will find two code and change both):

var maxresults=10;

change to

var maxresults=5; //type your value here

Now you can show you post accordance your label, display it as you wish.

That's it and thank you.

February 16, 2014

Four Kinds of Recent Posts For Blogger With Javascript

Recent Posts are the latest post from your blog, most landing to your blog or website is on posting page which already index with search engine, so to show your reader what is your new posting, you must show it on recent posts widget. I have collected four kinds of recent posts for Blogger  which you can used.

Recent Posts For Blogger With Javascript

To use this, you must copy and paste the code inside HTML/Javascript Gadget in your Blogger Layout Dashboard, you can find it by clicking Add Gadget, then scrool down to find gadget like image below:

add html/javascript

Recent Post With Javascript
Blogger Recent Posts With Javascript.
Blogger Recent Posts.

1. Recent posts with side scroll, you can set height and count value

recent posts blogger with javascript
<script src="http://helplogger.googlecode.com/svn/trunk/listbadge.js">{"pipe_id":"1a6640e2a78b2c6e736f2220529daae5","_btype":"list",
"pipe_params":{"URL":"http://YOUR-BLOGSPOT-URL/feeds/posts/default"},
"hideHeader":"false","height":"230","count": 2 }</script>
<style type=text/css>
.eggTray {margin:10px 0px;padding:0px;}
.ybr li  {border-bottom:0px #cccccc dotted; padding:0px 0px 10px 0px!important;}
.pipesTitle {padding-top:0px;}
.pipesDescription {display:true;}
.ycdr {background:transparent url(https://blogger.googleusercontent.com/img/b/R29vZ2xl/AVvXsEgvGFFY7NjPQbADZdfVFfMJXCXLS0_QH-xE4d9WWfKgPw8HxmHSb4O4LdJB5MyP3a5LcqEGhOnvwZHiKYq2EPKzCDydJm0rNfQVMhIdlb9RvjJ5qNu7xcGoYWJ4fboz3w___8CZQMPd6P4/s1600/logo.png) 0px 0px no-repeat; padding: 1px 0px 0px 19px; height:14px; margin: 4px 0px 0px 0px;line-height:14px;}
.ycdr, .ycdr a {color:#999999;}
.widget .popular-posts ul {padding-left:0;} 
</style>

2. Recent posts slider widget with fade effect. 

recent posts blogger with fade slider
<link rel="stylesheet" type="text/css" href="http://blogger-json-experiment.googlecode.com/svn/resources/blogger-feed-rotator-plugin/default-style.min.css"/>
<script type="text/javascript" src="http://ajax.googleapis.com/ajax/libs/jquery/1.9.1/jquery.min.js"></script>
<div id="slider-rotator" class="slider-rotator loading"></div>
<script type="text/javascript" src="http://blogger-json-experiment.googlecode.com/svn/resources/blogger-feed-rotator-plugin/blogger-feed-rotator.min.js"></script>
<script type="text/javascript">
makeSlider({
    url: "http://YOUR-BLOGSPOT-URL"
});
</script>
3. For me this one is a nice recent post widget

recent posts blogger with json
<link href="https://dl.dropboxusercontent.com/u/137869302/style.css" type="text/css" rel="stylesheet" />
<script src="https://dl.dropboxusercontent.com/u/137869302/json.js"></script>

<script type='text/javascript'>
var numposts = 3;
var showpostthumbnails = true;
var displaymore = false;
var displayseparator = true;
var showcommentnum = false;
var showpostdate = false;
var showpostsummary = false;
var numchars = 100;</script>
<script type="text/javascript" src="http://YOUR-BLOGSPOT-URL/feeds/posts/default?orderby=published&alt=json-in-script&callback=labelthumbs"></script>

4. Static recent posts, I was use it here in my blog, now I use no.2
 
static recent posts blogger with javascript
<script language="JavaScript">
imgr = new Array();
imgr[0] = "https://lh5.googleusercontent.com/-U6Zvv-gKB9Q/T7nuuNurOUI/AAAAAAAAAlE/XUhuecqHO0w/s200/images.jpeg";
showRandomImg = true;
tablewidth = 400;
cellspacing = 2;
borderColor = "#11170d";
bgTD = "#73b0a9";
imgwidth = 120; //image thumb with
imgheight = 90; //image thumb height
fntsize = 12; 
acolor = "#000";
aBold = false;
icon = " ";
text = "comments";
showPostDate = false;
summaryPost = 0;  // this to show summary or not
summaryFontsize = 11;
summaryColor = "#666";
icon2 = " ";
numposts = 7;  //how many post show
home_page = "http://YOUR-BLOGSPOT-URL";
</script>
<script src="https://dl.dropboxusercontent.com/s/55hv1y6m4zmbgtu/recentposts_horizontal.js?dl=1&token_hash=AAHP5vPfxrschulh4xx4fOTLVlheTKjU0ZiaTpSXNQE3sQ" type="text/javascript"></script>

That's four common kinds of recent post which usually used on my blog, but there is one blogger recent posts without javascript which can used, it from feedburner publicize buzzboost, you can see how it display from there.

I hope you can choose which one is best for your blog and do not forget to adjust site address YOUR-BLOGSPOT-URL became yours, thanks.

February 11, 2014

Hide Home Attribute on Blogger

Hide Home Attribute on Blogger

By default your blog on Blogger have post footer on homepage which comprised of shared buttons, comment label, Labels label and information about author and date, when you do some modification like grid layout, make summary and thumb or something like that, the information show repeatedly follow your post number (see image above).

Tho hide that all things on your homepage, follow this steps:

1. Log-in on your Blogger
2. From Dashboard go to Template
3. Click Edit HTML
4. Copy this code below before </head>

<style type='text/css'>
<b:if cond='data:blog.pageType != &quot;static_page&quot;'>
<b:if cond='data:blog.pageType != &quot;item&quot;'>
.post-footer {display:none;}
.comment-link {display:none;}
.post-labels {display:none;}
.post-rating {display:none;}
</b:if>
</b:if>
</style>

OR you can use this code below:

<style type='text/css'>
<b:if cond='data:blog.pageType == &quot;index&quot;'>
.post-footer {display:none !important;}
</b:if>
</style>

5. Preview and Save Template if already accordance with your wish.

The script above hide all your blog homepage attribute, if it not static_page and not item page and it will only hide on your index page. For me this is a nice trick, because I still have all attribute on my static page and item page.

That's it and thanks.

February 3, 2014

Blogger Random Posts Widget With Thumbnail

Blogger Random Posts Widget With Thumbnail

Random Post is randomly showing your posts from beginning to the last post, this can be display as a widget on sidebar or before your footer, in this article will show show you a Blogger random posts widget with thumbnail or before footer.

To display this as a widget, first log-in to your Dashboard, and then click Layout, click Add a Gadget on your sidebar, scroll down and find HTML/JavaScript Gadget, paste this copy below inside it:

<style>
<!--
#random-posts img{float:left;margin-right:10px;border:1px solid #999;background:#FFF;width:72px;height:72px;padding:3px}
-->
</style>
<ul id='random-posts'>
<script type='text/javaScript'>
var randompost_numposts=5;
var randompost_snippet_length=60;
var randompost_info='yes'; 
var randompost_comment='Comment';
var randompost_disable='';
var randompost_current=[];var randompost_total_posts=0;var randompost_current=new Array(randompost_numposts);function totalposts(json){randompost_total_posts=json.feed.openSearch$totalResults.$t}document.write('<script type=\"text/javascript\" src=\"/feeds/posts/default?alt=json-in-script&amp;max-results=0&amp;callback=totalposts\"><\/script>');function getvalue(){for(var i=0;i<randompost_numposts;i++){var found=false;var rndValue=get_random();for(var j=0;j<randompost_current.length;j++){if(randompost_current[j]==rndValue){found=true;break}};if(found){i--}else{randompost_current[i]=rndValue}}};function get_random(){var ranNum=1+Math.round(Math.random()*(randompost_total_posts-1));return ranNum};
</script>
<script type='text/javaScript'>
function random_posts(json){a=location.href;y=a.indexOf('?m=0');for(var i=0;i<randompost_numposts;i++){var entry=json.feed.entry[i];var randompost_posttitle=entry.title.$t;if('content'in entry){var randompost_get_snippet=entry.content.$t}else{if('summary'in entry){var randompost_get_snippet=entry.summary.$t}else{var randompost_get_snippet="";}};randompost_get_snippet=randompost_get_snippet.replace(/<[^>]*>/g,"");if(randompost_get_snippet.length<randompost_snippet_length){var randompost_snippet=randompost_get_snippet}else{randompost_get_snippet=randompost_get_snippet.substring(0,randompost_snippet_length);var space=randompost_get_snippet.lastIndexOf(" ");randompost_snippet=randompost_get_snippet.substring(0,space)+"&amp;#133;";};for(var j=0;j<entry.link.length;j++){if('thr$total'in entry){var randompost_commentsNum=entry.thr$total.$t+' '+randompost_comment}else{randompost_commentsNum=randompost_disable};if(entry.link[j].rel=='alternate'){var randompost_posturl=entry.link[j].href;if(y!=-1){randompost_posturl=randompost_posturl+'?m=0'}var randompost_postdate=entry.published.$t;if('media$thumbnail'in entry){var randompost_thumb=entry.media$thumbnail.url}else{randompost_thumb="https://blogger.googleusercontent.com/img/b/R29vZ2xl/AVvXsEjJZLUZgVoK4NLgz-7rHrFfRfCkjGJBCSq7LXrMN50t8OihZ4h39TGOIeqcE9704ejRjT05SX644ZJ6GPq-cEZPaGLN3l48ZTygnYRed6klWsP-OD1vb2gTfE9OexNoR-EGxGOVWWPThTJB/"}}};document.write('<li>');document.write('<img alt="'+randompost_posttitle+'" src="'+randompost_thumb+'"/>');document.write('<div><a href="'+randompost_posturl+'" rel="nofollow" title="'+randompost_snippet+'">'+randompost_posttitle+'</a></div>');if(randompost_info=='yes'){document.write('<span>'+randompost_postdate.substring(8,10)+'/'+randompost_postdate.substring(5,7)+'/'+randompost_postdate.substring(0,4)+' - '+randompost_commentsNum)+'</span>'}document.write('<div style="clear:both"></div></li>')}};getvalue();for(var i=0;i<randompost_numposts;i++){document.write('<script type=\"text/javascript\" src=\"/feeds/posts/default?alt=json-in-script&amp;start-index='+randompost_current[i]+'&amp;max-results=1&amp;callback=random_posts\"><\/script>')};
</script>
</ul>

And to display random posts before your footer, you must go to Dashboard, Template and click Edit HTML, scroll down and find and paste the code above before this code below:

<div class='post-footer'>
<div class='post-footer-line post-footer-line-1'><span class='post-author vcard'>

To modify correspond to your needs will described as follows:

change this code below to find your style:
<!--
#random-posts img{float:left;margin-right:10px;border:1px solid #999;background:#FFF;width:72px;height:72px;padding:3px}
 -->

var randompost_numposts=5;        // how many post you want display
var randompost_snippet_length=60; // snippet length title
var randompost_info='yes';        // show comment count and date 
var randompost_comment='Comment'; // show comment text

That's it, thank you.

February 2, 2014

Make Blogger Post Thumbnail and Summary on Homepage

Blogger Post Thumbnail and Summary on Homepage
By default Blogger homepage on your blog show full article about your posting, even you already limited how many post will showing, it look long and very long article display on your homepage, except if you set only one post display there, to solve this you need make Blogger post thumbnail and summary on homepage, with so your homepage will have a nice looking with 'Read More' button to click full article.

To do that things above you must login to your Blogger Dashboard, then go to Template menu and click Edit HTML, scroll down and find  ]]></b:skin>, above it copy this code below:

.box-readmore{text-align:right}
a.readmore{padding:4px 15px;text-decoration:none;font-size:14px;background:#666 url() left top repeat-x;border:0px solid #CAC4C4;color:#fff;-moz-border-radius:04px; -khtml-border-radius:04px;left top repeat-x}
a.readmore:hover{background:#222 url() left top repeat-x;border:0px solid #3F7B84;color:#FFF}

Now you have find this code: </head>, above it copy and paste this code below:

<script type='text/javascript'>
summary_noimg = 400;
summary_img = 350;
img_thumb_height = 120;
img_thumb_width = 150;
</script>
<script type='text/javascript'>
    //<![CDATA[
    function HTMLtagdrop(strx,chop)
    {
    if(strx.indexOf("<")!=-1)
    {
    var s = strx.split("<");for(var i=0;i<s.length;i++){if(s[i].indexOf(">")!=-1){s[i] = s[i].substring(s[i].indexOf(">")+1,s[i].length);}}strx = s.join("");}
    chop = (chop < strx.length-1) ? chop : strx.length-2;while(strx.charAt(chop-1)!=' ' && strx.indexOf(' ',chop)!=-1) chop++;strx = strx.substring(0,chop-1);return strx+'...';}
    function ThumbnailSummary(pID){
    var div = document.getElementById(pID);
    var imgtag = "";
    var img = div.getElementsByTagName("img");
    var summ = summary_noimg;
    if(img.length>=1) {imgtag = '<span style="float:left; padding:0px 10px 5px 0px;"><img src="'+img [0].src+'" width="'+img_thumb_width+'px" height="'+img_thumb_height+'px"/></span>';
    summ = summary_img;
    }
    var summary = imgtag + '<div>' + HTMLtagdrop(div.innerHTML,summ) + '</div>';
    div.innerHTML = summary;
    }
    //]]>
</script>

Last move is find : <data:post.body/>, you will found three code like that, on second code which your found, replace with this code below, or sometimes you have replace the third one, just preview it first to check you replace correct code:

<b:if cond='data:blog.pageType != &quot;static_page&quot;'>
<b:if cond='data:blog.pageType != &quot;item&quot;'>
<div expr:id='&quot;summary&quot; + data:post.id' style='text-align: justify'>
<data:post.body/>
</div>
<script type='text/javascript'>ThumbnailSummary
(&quot;summary<data:post.id/>&quot;);</script>
<div class='box-readmore'>
<a class='readmore' expr:href='data:post.url'>Read More&#187;</a>
</div>
</b:if>
</b:if>
<b:if cond='data:blog.pageType == &quot;item&quot;'>
<data:post.body/>
</b:if>
<b:if cond='data:blog.pageType == &quot;static_page&quot;'>
<data:post.body/>
</b:if>

Just make sure you preview first before save your template to see the correct results as you wish, but if you save it already, you can return to the previous code by pressing crtl-z (undo).

That's it and thank you.

Blogger Dashboard Layour Menu Error

Blogger Dashboard Layour Menu

Blogger Layout on Dashboard Blogger make your blog design easily, drag and drop to move widget accordance with our wishes, to add some gadget just click on Add a Gadget widget and choose what gadget you want use. 

But how if that Layout menu getting error ?

Yesterday, I get my Layout blank, nothing invisible to click, all gadget gone only empty screen display, but my blog page display is fine, I am searching from search engine about this issue but found nothing, the display as shown in the following image:

Blogger Dashboard Layour Menu Error

I'm really confused and do not know what to do, but suddenly when clicking to preview menu on Edit HTML Template, I see the error message as below:

LHS of numeric is null 8 , bla bla bla bla

So imediatelly go to line 8 on Edit HTML template and found wrong meta descriptions writing, that is dynamic meta content which use expr:content  but written using static content, example:

<meta expr:content='YOUR-DESCRIPTION' name='description'/>
 
Should be: 

<meta expr:content='data:blog.pageTitle' name='description'/>

After doing repairs on the above meta content, Layout menu on Blogger Dashboard back to normal and my problem is solved. I am very happy to solved it by my self, hehehehe...

I hope this can be useful for some who get same error with me, thanks.

February 1, 2014

Using Google+ Comment on Blogger

Comment is one thing that is important to make your website be popular and get a high ranking on search engines like Google, Bing and Yahoo!. On Blogger there are some advantages to getting a chance to get something like that, why? because now on Blogger, you can connected your blog with your Google+ page, so you can easily automatically sharing web page as soon as you publish your posting.

Then, you also definitely get some benefit from using Google+ comments, and to use the Google+ comments on current Blogger is very easy. I guess everyone has also been able to do it easily, but it does not hurt to write the steps required about using Google+ comments on Blogger in this article.

These steps are:

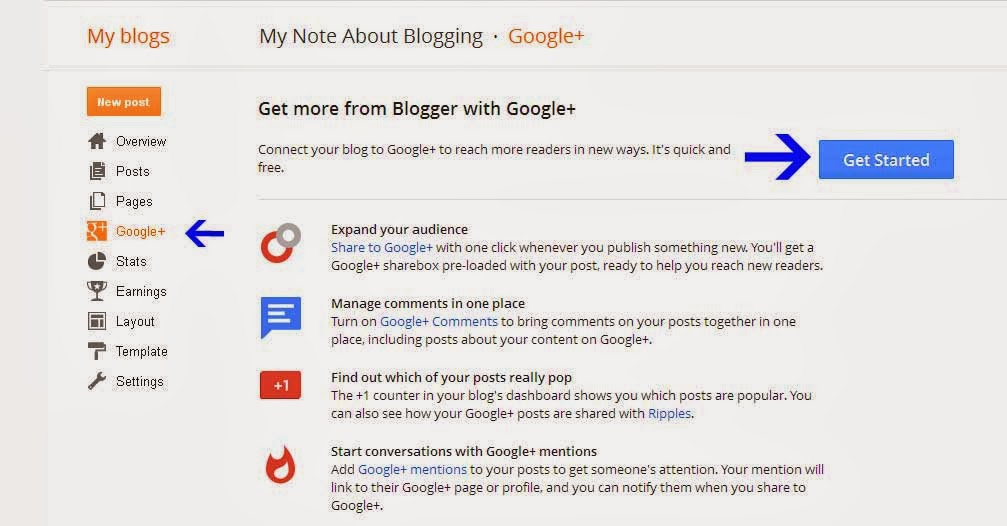
Connect Blogger with Google+ , from your Dashboard, click Google+ and click Get Started button and follow the instruction until finished, see image below:

Connect blogger with google+

After above step your Blogger also use you Google+ profile, it means you're had successfully connected both of that services, now its time to use Google+ comment on Blogger:

Still on your Blogger Dashboard and click Google+ , in that menu checklist Use google comment on blog, you can see this image:

Google+ comment - Blogger dashboard

Yes, in this step has already automatically your Blogger using Google+ comment, that means all you Blogger comment also show on you Google plus page, it is very benefit for you and help you to get change for better ranking .

Go to one of your page, you will see difference box comment show on your page, see image below:


But you must be careful using this comment if you plan to use custom domain, see : https://support.google.com/blogger/answer/2981015#alert

blogger google+ alert

That's it. I hope this can be useful for someone, thanks.

Regards,

Another Blogger hcard Issue From Google Webmaster Tool Richsnippet Preview

hcard Issue From Google Webmater Tool Richsnippet Preview
On my article before was tell you about three common error which find when you test your website page using webmaster tool, but not all Blogger template have the same error, I found another Blogger hcard issue from Google webmaster tool richsnippets preview.

This issue about hcard author and found when I running testing tool on my other blog, and this error can not be solved with same way like my article previously. So if you have same problem with me and have same error, you can try this way to fix webmaster tool richsnippets preview.

The error something like this below:

Error: This information will not appear as a rich snippet in search results,
 because it seems to describe an organization. Google does not currently
 display organization information in rich snippets

 Error: At least one field must be set for Hcard.
 Error: Missing required field "name (fn)".

And to fix it, do  from your Blogger Dashboard, then click Template, click Edit HTML, inside it you must search some proper code, because there is two code could make this error, first code is:

<span class='post-author vcard'>

You will find two of code above, you must deleted both or comment it, see below:
<!-- <span class='post-author vcard'> -->
.....
.....
<!-- </span> -->
If you not found above code or that way not solve your problem, search second code below:

<span class='post-author vcard'>

And after you found it, replace with this code below:

<!-- hCard"author" error fix Start -->
<span class='post-author vcard'>
<b:if cond='data:top.showAuthor'>
<b:if cond='data:post.authorProfileUrl'>
<span class='fn' itemprop='author' itemscope='itemscope' itemtype='http://schema.org/Person'>
<meta expr:content='data:post.authorProfileUrl' itemprop='url'/>
<a expr:href='data:post.authorProfileUrl' rel='author' title='author profile'>
<span itemprop='name'><data:post.author/></span>
</a>
</span>
<b:else/>
<span class='fn' itemprop='author' itemscope='itemscope' itemtype='http://schema.org/Person'>
<span itemprop='name'><data:post.author/></span>
</span>
</b:if>
</b:if>
</span>
<div class='author-profile' itemprop='author' itemscope='itemscope' itemtype='http://schema.org/Person'>
<b:if cond='data:post.authorPhoto.url'>
<img expr:src='data:post.authorPhoto.url' itemprop='image' width='50px'/>
</b:if>
<div>
<a class='g-profile' expr:href='data:post.authorProfileUrl' itemprop='url' rel='author' title='author profile'>
<span itemprop='name'><data:post.author/></span>
</a>
</div>
<span itemprop='description'><data:post.authorAboutMe/></span>
</div>
<!-- hCard"author" error fix End-->

I think the problem is only found in the old templates, or templates made ​​in the past, because I personally just find it on my blog which using a template that was made ​​in 2010, this only my personal opinion.

That's it, do some test with this url : Google Webmasters Tools Richsnippets

Regards,

Fix Blogger Structured Data Testing Tool Error

You can use Google webmaster structured data testing tool in this url: http://www.google.com/webmasters/tools/richsnippets, it will test your data markup and also to ensure that Google can do extract data structure on your web page, you can also see how your page preview in search results on search engine (rich snippets previews). But, how to fix Blogger structured data testing tool error which shown after you preview your page on that testing tool?

Fix Blogger Structured Data

This some common error on Blogger page when doing preview test using webmaster richsnippets testing tool above and how to fix them:

1. Authorship and publisher markup error:

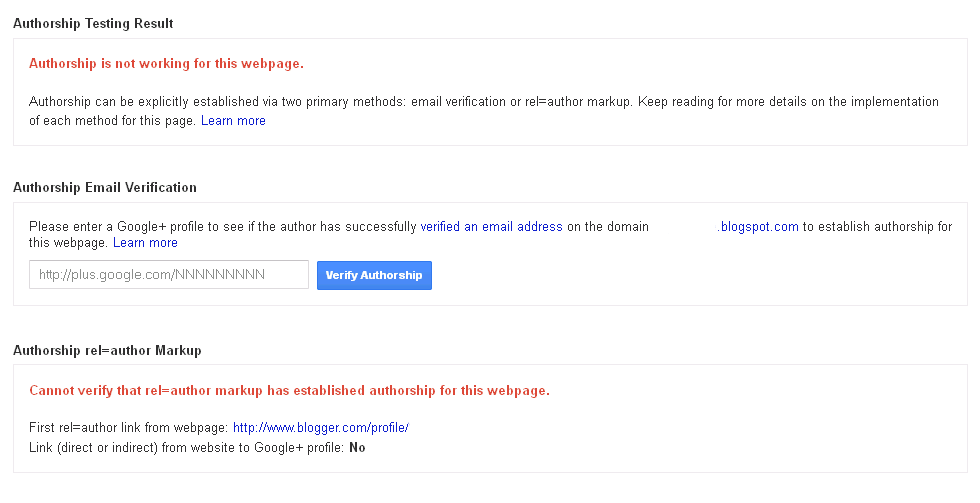
Authorship is not working for this page
Cannot verify that rel=author markup has established authorship .....
Cannot verify publisher markup .....

Blogger Structured Data Testing Tool Error

When this error find, a simple way to fix it is connect your blog with your Google+ page, from your Dashboard click Google+ and click Get Started, follow rest of instruction until finished, see image below:

Connect Blogger With Google+

Or you can add this code below after <head> in your Dashboard >> Template >> Edit HTML:

<link rel='Author' href='http://plus.google.com/YOUR-Googleplus-ID'/>
<link rel='Publisher' href='http://plus.google.com/YOUR-Googleplus-ID'/>

2. Error about updated field and author hcard.

Error: Missing required field "updated"
Error: Missing required hCard "author"

To fix this issue go to Dashboard >> Template >> Edit HTML , scroll down and find hfeed and hentry, you can also search about two code above with ctrl-F inside Edit HTML and type to search.

change hfeed  >>>>> h-feed
change hentry >>>>> h-entry

Or if only update fiield error, find <data:post.timestamp/>, and change it to:

<span class='updated'><data:post.timestamp/></span>

3. Image_url, blogid, postid is not a part of schema:

Error: Page contains property "image_url" which is not part of the schema.
Error: Page contains property "blogid" which is not part of the schema.
Error: Page contains property "postid" which is not part of the schema.
 or
Error: Page contains property "image_url" which is not part of the schema.
Error: Page contains property "aiablogid" which is not part of the schema.
Error: Page contains property "aiapostid" which is not part of the schema.

Steps how to fix this erorr from your Dashboard, Templates, Edit HTML and find

<meta expr:content='data:post.firstImageUrl' itemprop='image_url'/>
 and
<meta expr:content='data:blog.blogId' itemprop='blogId'/>
<meta expr:content='data:post.id' itemprop='postId'/>

Change it to:

<meta expr:content='data:post.firstImageUrl' itemprop='image'/>
 and
<!-- <meta expr:content='data:blog.blogId' itemprop='blogId'/>
<meta expr:content='data:post.id' itemprop='postId'/> -->

Or you can delete 2 line about postid and blogid.

Maybe that's it three about common error which find when you test your page with richsnippets preview in Google webmaster tool, this markup data is very useful to tell search engine how your page look, and it can be make your blog or website more SEO.

Update October 18, 2015

If you cannot find:
<meta expr:content='data:post.firstImageUrl' itemprop='image_url'/>

go to Edit HTML template, scroll down and find below code:
<a expr:name='data:post.id'/>

right above it paste this code below:
<b:if cond="data:post.thumbnailUrl">
  <meta expr:content='data:post.thumbnailUrl' itemprop='image'/>
</b:if>

For datePublished Error, fix it from Dashboard Setting and choose Language and formatting, change Timestamp Format to full date format: 'Day, Month Date, Year'  ==> 'Sunday, October 18, 2015', After that set it on your Blog Post Layout.

To fix Headline missing is required blogger error:

Find inside Edit Html Template menu this code below:
<h3 class="post-title entry-title" itemprop="name"></h3>

Change it to:
<h3 class="post-title entry-title" itemprop="headline"></h3>

Best Regards and Good Luck,

January 25, 2014

Create Blogger For First Time (Sign-Up Blogger)

Blogger is one of most popular blogging services which own by Google, to create it and start your own blog, you have to sign-up on blogger home page on http://www.blogger.com, or you can registered one gmail account to have all Google service including this Blogger.

Now we learn how create Blogger for first time or sign-up on Blogger. For you to decided sign-up on blogger home page, access the address above and you will be prompt to create username and password, see image below:

Create Blogger For First Time - Sign Up


Click create account button and you will be prompt to fill some information about yourself and doit until it finished and message that you have successfully register appears on the screen.

Now you have to log-in with a new username and password that you create before, inside your blogger account click New Blog button in left page below your blogs name (YOURNAME blogs) and it will be prompt to window about blog that you have to create.

Give the title for blog which you have to create and also the address (URL), if you finished click Create Blog button, see image below:

Create Blogger For First Time - Blog Title


After steps above your blog is created and your ready to blogging with Blogger, see image below:

Create Blogger For First Time - Start Posting

Congratulations you have a blog now, start posting and happy blogging, that's it my article about how to create Blogger for first time (Sign-Up Blogger)

PS: you can also create blogger from your gmail account.